Showing posts with label How To. Show all posts

Tuesday, 4 February 2014

Safari: Setting third party iframe cookies

Safari is known to be strict about permissions in iframes, especially when the domain of the iframe page is different from the domain of the parent page. Some would even say paranoically strict.

Safari will block you from setting cookies for the third-party domain (the different domain in the iframe), unless you already have cookies set for that domain.

Here's a snippet of javascript I pulled together last week that as a way to get around the iframe cookie security. It works great if your page is nice and light and loads fast, otherwise it can feel pretty clunky with the triple loading...

window.onload=function(){
 if(navigator.userAgent.indexOf('Safari')!=-1&&navigator.userAgent.indexOf('Chrome')==-1){
  var cookies=document.cookie;
  if(top.location!=document.location){
   if(!cookies){
    href=document.location.href;
    href=(href.indexOf('?')==-1)?href+'?':href+'&';
    top.location.href =href+'reref='+encodeURIComponent(document.referrer);
   }
  } else {
   ts=new Date().getTime();document.cookie='ts='+ts;
   rerefidx=document.location.href.indexOf('reref=');
   if(rerefidx!=-1){
    href=decodeURIComponent(document.location.href.substr(rerefidx+6));
    window.location.replace(href);
   }
  }
 }
}

Here's what it basically does:
  • The javascript is placed in the page loaded inside the iframe. 
  • If the JS is run inside the iframe and the browser is Safari and there are no cookies set, then we frame-burst the page to take over the window and append the original parent page URL as a parameter. 
  • If the JS is run not inside a frame and the browser is Safari, then we set a timestamp cookie (now that we are out of the iframe) and if a reref param exists we redirect back to the original page.
  • If the JS is run inside the iframe and the browser is Safari and there ARE cookies set, then we do nothing.

And one more time in pseudo-code

if(browser is Safari){
 if(we are in an iframe){
  if(no cookies){
   set window_url = iframe_url + reref=iframe_parent_url;
  }
 } else {
  set a timestamp cookie;
  if(reref exists in url){
   redirect to original url so we have iframe again
  }
 }
}

Tuesday, 21 January 2014

WordPress: Remove/hide Google+ field from Contact Info on user admin page

This WordPress tweak is pretty unlikely to come up for most developers, but I was asked to remove the Google+ field from the Contact Info section of the User admin page. Here's a quick snippet to paste into functions.php to do so:

function custom_admin_js() {
  // hide WP's Googleplus input on user profile
  if( strpos($_SERVER["REQUEST_URI"], '/user-edit.php')) {
    echo '<script type="text/javascript"> jQuery(\'#your-profile input[name="googleplus"]\').parent().parent().hide(); </script>';
  }
}
add_action('admin_footer', 'custom_admin_js');

Monday, 22 July 2013

Checking A File's Upload Size In The Browser

This really just a quick note so I don't lose the code snippet I just used...

I'm working on a form which allows users to upload a file, but we want to stop them uploading giant things. Ultimately the server's maximum upload filesize will stop anything too huge getting through, but it's nice to remind people of the limit before they bother uploading.

This is a great little snippet to do that in current versions of Chrome, Firefox and Safari.

$('#contact_file').bind('change', function() { 
  filebytes = this.files[0].size;
  if(filebytes>1024*1024*5) {
    alert("The file you selected is TOO LARGE and will be rejected by the server. Please select a smaller file."); 
  }
});

If you can't work out what is happening there, then "contact_file" is the id from your file input and 1024*1024*5 is the limit you want to impose, in this case 5MB. Don't forget to check that the server side limit is in line with this.

It won't work in IE* or some older browser versions, but it's a nice extra courtesy for users where it can be executed. You could also hook it up to the submit button if you want to do a check at that stage.

*Apparently there's an ActiveX thing you can do for IE users, but I am not so inclined.

Sunday, 7 July 2013

How To: International Exchange Rates in iOS Stocks App

I like to keep an eye on the exchange rate for the US Dollar against the British Pound Sterling GBP and the Euro, and have been using the Stocks app built into iOS. I don't have any stocks, so I only use the application for tracking exchange rates and it performs well for my needs.


Over the last few weeks I have shared this functionality with a few friends who also want to keep track of exchange rates and realized that setting these up in the Stocks app is not at all obvious, some would say impossible unless you know the process. Thankfully, once you know the process, it's a piece of cake.

Here are the steps

  1. Open the Stocks app
  2. Tap the ( i ) icon in the bottom right hand corner
  3. Tap the +  icon in the top left corner
  4. Enter the currency rate described as AAABBB=X in the search box (e.g: GBPUSD=X )
  5. Tap the item in the list
  6. Click the "Done" button in the top right corner


How To: Import an Excel CSV file with Sequel Pro

I've been working with a database migration project lately that is bringing together data from three different sources. One of those sources is a big Excel spreadsheet. The data in the spreadsheet has been problematic due as each row included cells with pipe delimited items, typos and other strangenesses that have slowed the pat to a relational database. On top of "ropey data", I also had some problems with importing the data into mySQL.

Usually I would just Save As a CSV (comma separated values) file, and then import the CSV file using OSX application Sequel Pro. This time I was getting fields by split due to some of the fields containing quotes and commas in their text content. I tried to looking for options to use different delimiters, but this is not available Excel (certainly not the version I use), I tried opening the spreadsheet in Google Docs and saving as CSV from there, but this returned the same result. It seemed that Sequel Pro's import engine was not able to interpret the "" encoding of " content and the age-old options of backslashing  \" or custom delimiters are no longer available. Upgrading to the latest version of Sequel Pro didn't help either.

I did a bit of searching and eventually found a source that outlined the solution to the problem. Realistically, it's a simple thing I should've thought of myself, but if I missed it and others have too, I thought it was worth documenting here so that others could save time looking for a solution.

The problem here is that the CSV you have uses Excel-style quote escaping, where escaped double quotes are represented by "" instead of using backslash escaping - \" . 
When you select the CSV file in the import dialog, you can see there's a "Fields escaped by" setting underneath the file selection dialog.  If you change this to a double quote, instead of a backslash, you'll find your file is imported correctly (and your choice will be remembered in future).

Here's an image of what you need to alter for Excel files to be processed properly:


Don't forget that you've made this change when it comes to importing other CSV files. The last part of the quote above states "and your choice will be remembered in future", so you *may* need to change it back to backslash \ for other files.

Wednesday, 5 September 2012

GarageBand '11 : Upgrade your instruments for free

I've been writing and playing music for a number of years and lately have been using Apple's GarageBand to capture my writing ideas. It's certainly not a fully fledged DAW, but I've found it to be more than adequate for getting an idea fleshed out to a demo quality recording.

Here are some example tracks to show what I've been producing with GarageBand lately:


The more I have used GarageBand, the more I have found its limitations (although these are not unreasonable limits for the application that it is). The main one for me is that the software instruments are  a minimal set, some of which are what I would consider novelty sounds (basically unusable) and others are flawed with pitch issues (e.g. Fretless Electric Bass). Coupling this with not being able to MIDI OUT to an external device (of which I have a few), the software instrument set can become a bit frustrating.

I really don't like the default Electric Piano instrument (sounds too crunchy like a clav to me), I want a sound like a classic Rhodes or a Yamaha DX7, so I decided to find out how to get one without throwing any money at it.


Audio Unit Instruments / Modules

The first solutions I found were from 4Front Technologies. I downloaded and installed their E-Piano (based on Yamaha DX7 e-piano), R-Piano (based on Rhodes Stage Piano) and the 4Front Bass since I was noticing some pitchiness on Fingerstyle Electric Bass (specifically playing A1). I'd recommend grabbing them all and the Upright Piano so you can install them all in one hit,

Here's the process to install and use these instruments:
  • Download the instruments you want from 4Front
  • Unzip the file and copy the .component file to Library/Audio/Plug-Ins/Components
  • Quit GarageBand if it is running
  • Open GarageBand and open a project 
  • Create a new Software Instrument track and open the Track Info pane ( ⌘+I )
  • Click the Edit tab and then the Sound Generator list, your new instrument(s) should appear in the Audio Unit Modules section
  • Select the instrument you wish to use
  • Adjust any instrument settings or Effects

Select your new instrument in the "Audio Unit Modules" section

If you want the instrument to show up on the Browse tab in the correct list, then follow these steps:
  • Select the instrument group on the Browse tab that you want the instrument to be saved into, and the select icon that you want to be used.
  • Click the Edit tab and select the instrument as the Sound Generator
  • Adjust any instrument settings or Effects
  • Click on "Save Instrument..." and enter the name for this instrument

Obviously the choice of free instruments available is not as broad as those available for purchase, but there are some good ones out there. There is a good freeware AU list at Don't Crack.com and an extensive list at KVR Audio, although many are only VST plugins, not AU. Just remember that you get what you pay for, so don't be upset if some don't work well.

UPDATE: You can also find a good selection of plugins which are available in AU format in "The 27 best free VST plug-ins in the world today" (2012) on MusicRadar.com


Soundfonts (.sf2)

Another option for expanding your instrument arsenal is Soundfonts. These files have been around since the 1990s, so there is a large variety in both instruments and quality. There are probably a lot more

There are a few quirks about using these for instrument sounds. GarageBand will use .sf2 files, but not the archive formats .sfark or .sfpack. Both these formats appear to be abandoned now and unpacking the soundfonts on OSX is next to impossible.

Although some soundfonts are available as "collections", these are a little less easy to use in GarageBand. Unless you can send a MIDI Program Change to the track, you'll be stuck using the first sound/voice in that collection. I tend to use single instrument soundfonts so that I can save them as an instrument once installed.

Some sources I have used for .sf2 soundfont files are HammerSound, ЯK Hive, NTONYX and  www.johannes.fr. Probably the largest soundfont archive is sf2midi.com, although it has some drawbacks: you need to register to download, the free downloads are slow (and require too many clicks in my opinion), and the zip files cannot be opened by OSX's Archive Utility (10.6)  - luckily they can be unzipped by the free app The Unarchiver. Nearly all of the .sf2 files I have tried to date have worked well, but some just don't work.


Here's the process to install and use a soundfont in GarageBand:
  • Find and download the desired soundfont .sf2 file
  • Copy the file to Library/Audio/Sounds/Banks
  • Quit GarageBand if it is running
  • Open GarageBand and open a project 
  • Create a new Software Instrument track and open the Track Info pane ( ⌘+I )
  • Click the Edit tab and then the Sound Generator list and select DLSMusicDevice from the Audio Unit Modules section
  • Double-Click the large button to the left of the DLSMusicDevice to edit the settings
  • Select your soundfont in the Apple Sound Bank Synthesizer list (QuickTime Music Synthesizer is the default value)
You can save the soundfont instrument so it is listed on the Browse tab by using the same steps outlined above for AU Instruments.


Pro Tip: If you want to organise your soundfont files into instrument types, or to keep a set of files together, etc. then you can create folders within Library/Audio/Sounds/Banks folder and this will be reflected in the Sound Bank list.

UPDATE 28-OCT-2012: I just found this post that links to downloads for "3.5 Gigabytes Of HQ Orchestral SF2" at newgrounds.com. I haven't tried them all yet, but those that I have tried are sounding pretty good. I also discovered freesf2.com which also has some great free SF2 files (although you'll need sfArk).

UPDATE 25-FEB-2014: Blogger's stats tell me that this post is getting quite a bit of traffic and that a chunk of that is coming from thegaragebandguide.com :)

Tuesday, 14 August 2012

How To: Connect Your PS3 To Mac Internet Sharing WiFi

Recently I moved to a new house and had to make changes to the way I set up my network to extend WiFi coverage. Part of the solution I employed was to enable Internet Sharing of the ethernet connection on my Mac Mini so other devices could use it as a WiFi connection point.

My Mac Mini is still running OS X 10.6.8 so I had to solve the problems of connecting non-Apple devices to a Mac using WEP. Even when I had other devices connecting, I couldn't get my Playstation 3 to connect. Thankfully the PS3 connection test gives some specific indicators of what is failing, so I could see that the problem was related to getting an IP Address assigned.

When you enable Internet Sharing on your Mac a file is created at /etc/bootpd.plist which should contain something like this:
<?xml version="1.0" encoding="UTF-8"?>
<!DOCTYPE plist PUBLIC "-//Apple//DTD PLIST 1.0//EN" "http://www.apple.com/DTDs/PropertyList-1.0.dtd">
<plist version="1.0">
<dict>
  <key>Subnets</key>
  <array>
    <dict>
      <key>_creator</key>
      <string>com.apple.nat</string>
      <key>allocate</key>
      <true/>
      <key>dhcp_domain_name_server</key>
      <string>192.168.2.1</string>
      <key>dhcp_router</key>
      <string>192.168.2.1</string>
      <key>lease_max</key>
      <integer>86400</integer>
      <key>lease_min</key>
      <integer>86400</integer>
      <key>name</key>
      <string>192.168.2</string>
      <key>net_address</key>
      <string>192.168.2.0</string>
      <key>net_mask</key>
      <string>255.255.255.0</string>
      <key>net_range</key>
      <array>
        <string>192.168.2.2</string>
        <string>192.168.2.254</string>
      </array>
    </dict>
  </array>
  <key>bootp_enabled</key>
  <false/>
  <key>detect_other_dhcp_server</key>
  <integer>1</integer>
  <key>dhcp_enabled</key>
  <array>
    <string>en0</string>
  </array>
  <key>reply_threshold_seconds</key>
  <integer>4</integer>
</dict>
</plist>

To get your Playstation3 to connect (or other device that is timing out while waiting for an IP Address), you need to change the integer value for the key reply_threshold_seconds from 4 to 0 (zero). Note: You will need an Administrator password to complete this process.

Here are the steps you'll need to follow to get this to work:

  • Turn on Internet Sharing so that the file mentioned above is created.
  • Open the Terminal application (usually found in Applications > Utilities)
  • Type this command and then press return to copy the file into the tmp directory:
    cp /etc/bootpd.plist /tmp/bootpd.plist
  • Turn off Internet Sharing. This will delete /etc/bootpd.plist
  • To open the copied file in TextEdit, type this command in the Terminal window and press return:
    open -e /tmp/bootpd.plist
  • Find this section near the end of the file
    <key>reply_threshold_seconds</key>
    <integer>4</integer>
  • Change 4 to 0 (zero).
  • Save and Close the file and Quit TextEdit.
  • To copy the file back to the original location, type this command  in the Terminal window and press return:
    sudo cp /tmp/bootpd.plist /etc
  • You will be prompted to enter a Password. Enter your Administrator password and press return.
  • Turn on Internet Sharing.
  • Try and connect with your PS3 (or other device).

You can also find details on how to fix this issue at Apple Support Communities and PlayStation®3 Technical Solutions.

Sunday, 12 August 2012

Internet Sharing WiFi with WEP encryption from OSX to non-Apple devices

I almost entitled this post as "How To Use Your Mac As A WiFi Hot-Spot", but hopefully the title I used will help more people find the article and get the simple answer on how to connect to Airport via Internet Sharing when using WEP as security.

There are a lot of simple articles about how to use your Mac as a WiFi Hot-Spot by sharing your Ethernet connection. If you don't know how to do that yet, then I recommend reading "How to Use Your Mac as a Wireless Router" which covers the general setup process nicely, although it does not address the problems you can face when using WEP and trying to connect from non-Apple devices (e.g Android phone/tablet, Windows PC, PS3, Wii, etc.)

The Mac Mini that I was using to share WiFi was running OS X 10.6.8, so the setup screens are slightly different from those in the article above. Here's a screenshot if you want to compare:


Mac OS X 10.6.8 only supports WEP security on Internet Sharing so you either have to use WEP or no security. Nobody wants uninvited users on their network, so using WEP is recommended. Unfortunately using WEP is what usually causes non-Apple devices to fail to connect to the network.

There is a "trick" to get it to work that I will clearly outline for you here, so you don't have to cobble together the solution from a half-dozen sources that all point in the direction but never actually have all the required steps (as I had to do).

This is the process that worked for me:

  • Set a Network Name that does not include spaces or special characters, you may need to reduce the name length (my actual Network Name is 9 characters long)
  • Leave the Channel as automatic unless you need to use something specific
  • Check the box for "Enable encryption (using WEP)"
  • Set the WEP Key Length to "40-bit (more compatible)"

Now comes the arcane step that will allow your non-Apple devices to connect
  • You must use a Password containing five HEXADECIMAL values prefixed with a dollar sign ($). The $ prefix tells your Mac you are entering a hexadecimal value. You do not need to use the $ prefix when connecting to the your Mac
  • Hexadecimal values contain of a pair of characters which are limited to 0-9 and A-F, so you need to enter a password which starts with $ and then has ten characters which must be numbers or the letters A, B, C, D, E or F. (examples $A1B2C3D4E5, $1234567890, $2FACEDBABE )
  • As soon as you enter the $ in the Password field, the WEP Key Length and the OK button will be disabled. When you have entered the same value in Confirm Password (including the $ prefix) then the OK button will be enabled for you to click.
  • If you want to use 128-bit encryption, you must enter 13 hexadecimal values, which equates to 26 characters plus the $ prefix. As soon as you type a password longer than described for 40-bit, then the disabled WEP Key Length field will change to 128-bit. (Note: I have not tested that 128-bit actually works)
  • Click OK and then check the Internet Sharing box, and then click Start.

You should now be able to connect your non-Apple device (and your Apple devices) to your HotSpot using the new password. Remember, you do not need to use the $ prefix when connecting to your Mac.

If you are still unable to connect to your Mac, it may be because your device is failing to receive an IP Address. This is a common problem with Playstation3 consoles, and there is a fix for that which I will detail in my next post How To: Connect Your PS3 To Mac Internet Sharing WiFi.


Note: This is a follow-up post to Dealing With WiFi Dead Zones.


Friday, 10 August 2012

Dealing With WiFi Dead Zones

This month we moved to a new home. Some things about the new place are better, other things are worse, and some things are just different. One of the "different" things is the property layout, it's much longer and narrower. This does cause a problem because the router is located at one end of the property, conveniently near my desk, but too far away from the living room for any usable WiFi.

I didn't want to install long ethernet cables here, so my first response was to look into signal boosting. I even tried the Windsurfer foil parabola reflector which didn't really work for me. Another inexpensive option I considered was to relocate the router to a more central position by using a long modem cable.  This approach didn't really work due to our property layout and the position of power outlets.

In the end I stumbled across a completely different approach which was fairly inexpensive and has provided WiFi signal across the whole house, although with two hotspots.

"TP-LINK's TL-PA211 powerline adapter takes advantage of your home's existing electrical wires to transfer data while simultaneously transferring traditional power. That means, with no additional wiring required, users can simply plug the TL-PA211 into existing power sockets and instantly establish a networking infrastructure."


I'd never used powerline adaptors for extending my network before, but I took a punt on these which has worked out to be a good solution for my set up. I plugged one powerline adaptor in next to the router and connected the ethernet cable, and then plugged the other adaptor at the other end of the house and connected it to my Mac Mini which is currently connected to the TV.

I then enabled Internet Sharing on the Mac Mini running 10.6.8, so that it acts as a WiFi hotspot. This worked great for connecting with an iPad and iPod Touch, but needed some special tweaks to connect non-Apple devices including an Android phone, Dell laptop, Wii and Playstation3. I'll detail the tricks for connecting those devices in my next posts.

Monday, 25 June 2012

Playing/Converting AVHDC .MTS files on OSX

Lately I've been using AVHDC (Advanced Video Coding High Definition) .MTS video files on OSX a bit. This video format is not greatly supported on OSX at this point in time. This HD format was developed by SONY and Panasonic and is considered to by a high quality format. My video files are coming from a Panasonic Lumix DMC-TZ10.

Playback
OSX does not currently natively support playback of these files. I recommend installing VLC http://www.videolan.org/vlc/index.html which is both free and has a large enthusiastic usage community.

Conversion 
If you want to use these files in iMovie then you have to import them directly from the camera. This can be both slow and reduce the video quality. If you are not wanting to use iMovie and just want to convert to MPEG-2, DivX, H.264, etc. then you will probably have noticed most search results end up pointing to an expensive piece of conversion software with a heavily crippled trial version.

VLC (see above) does include conversion/export functionality, but its results are a bit unpredictable and is best suited to stream capture.

The best option I have discovered which is fast, reliable and free is Handbrake http://handbrake.fr/ This application is commonly used by some to rip DVD content to a playable file, but it has a great video transcoder at it's core and really does a great job converting .MTS files on OSX for free :)

Thursday, 31 March 2011

WordPress Post ID from Permalink

Lately I've been migrating a few websites from Movable Type to WordPress. One of the SEO issues involved with that is supporting the old site's URLs so that existing page rankings don't drop off en masse.

A common Movable Type URL format appends the entry id to the URL which makes it easy to redirect to the correct content IF you have preserved the entry id from MT as the new post id in WP, other times it can be a lot more convoluted.

One of the functions I sometimes need to employ is pretty uncommon, (which is not surprising due it's rare use), so I thought I'd create a quick post here so I can can easily find it next time I need it.

The function is url_to_postid()

This function returns the id for a post or page from a given URL. I like to this of this function as the reverse of the commonly used get_permalink().

It's pretty hard to turn up any useful search results for this function so hopefully this page will help somebody when they need it.

Tuesday, 22 December 2009

Updating Google Map Marker's z-index

Lately I've been working on a web application that uses Google's Maps API. It's been an interesting and engaging project.

One of the limitations of the current Maps API is that the z-index of a marker cannot be changed after it has been created. The client requested that the selected marker "popped to the front" as some markers obscured others in certain map areas depending on zoom and closeness of coordinates. This was a reasonable request and would enhance the UI, but was not so easy to implement.


Mike Williams gives a good introduction to this issue and details of how to set the z-index of the marker when it is created with addOverlay() in his Google Maps API Tutorial. Having read this, I attempted to re-create each marker when it was clicked and keep track of the top most z-index. I had some success but had unpredictable z-index results and it was definitely an inefficient way to produce the desired effect.

I decided to browse the DOM and see if I could find a better way to do this. I found a guide to Undocumented Google API features which seems to be mostly out of date, but contained the very important details of how to calculate a Marker's default z-index:

Use marker.setZIndex(Math.round(marker.getLatitude()*-100000)) to get a moved marker to overlap correctly.

Even though setZIndex() and getLatitude() are not valid methods in the current API, it's easy to understand the calculation.

In my application I was already using a unique icon for each marker so that they displayed sequential letters (A,B,C...) and had added an index property to the marker object. I was able to leverage this with a bit of jQuery magic to find each icon in the DOM and alter the CSS z-index value. Since the default z-index is something like -108619296, I created a function to toggle the z-index between normal and front positions by multiplying it by -1.

icon = $("#mapbox div div div img[src='/images/markers/"+marker.index+".png']");
zidx = icon.css('z-index');
icon.css('z-index',zidx*-1);


Just to make sure that no other marker was still in the top position, I looped through my array of markers and reset the z-index with this function.

function reset_zorder(marker) {
$("#mapbox div div div img[src='/images/markers/"+marker.index+".png']").css('z-index',Math.round(marker.getPoint().lat()*-100000));
}


Obviously none of this is a copy+paste solution. but it should give anybody needing to manipulate Google Maps MAP Marker z-index a good example to work from.

Friday, 27 November 2009

How To: Android Scrollable Divs


Lately I've been working on a webapp for the Motorola Droid and a QNX CAR device. The application interface is a split screen with one half being a list of items of variable length. Neither of these browsers on these devices support iframes or scrollable divs, so the approach used in a traditional browser was not an option.

The application was using jQuery, so using the jQuery UI Draggable plugin was a natural choice. It was quick and easy to implement and worked well on the QNX device, but didn't work at all on the Android browser.

To get the prototype version of the application finished on time for the deadline, I resorted to adding up/down buttons to the interface that scrolled the div content by manipulating the margin-top via javascript. This satisfied the client, but as a solution it was less than optimal, and in my opinion it made the UI feel clunky.

At the time that I write this, there's not a lot of information about how to deal with this issue in the Android browser. It took me a while to discover that this issue is also a problem for the iPhone/iPod Touch browser and since Android's browser also uses WebKit, there is already a working solution called iScroll developed by Matteo Spinelli on Cubiq.org.

This code utilises WebKit's "touch" events, which are akin to click events, but are only fired by touch screens. You can find a great introduction to Javascript Touch Events on Michael's "Back To The Code" blog. If you're new to developing mobile webapps, you should probably also take a look at iPhone Webapps 101.

Hopefully posting these bits and pieces together here will help save somebody a lot of time searching on Google.

Friday, 20 November 2009

Skype vs XAMPP

I like Skype. I use it everyday. Most of the people I need to communicate with are Skype users. Skype handles chat, voice and file transfers to individuals and groups, and one-to-one video-chat, and allows you to cheaply connect to real-world telephony and SMS too. I'd have to say I am a bit of a fan.

The only annoyance I have found is that when I reboot my PC (which is not that often), Skype starts up and grabs port 80 before my XAMPP install starts. This means that my local XAMPP Apache install fails to start. In the past I've been forced to quit Skype, start Apache and then restart Skype. No big deal, but a little annoying.

Yesterday I had a closer look at Skype's Advanced Settings and found this problem can be resolved by simply unchecking the "Use port 80 and 443 as alternatives for incoming connections" option and restarting Skype. Simple stuff, but I though it was worth posting.

Monday, 26 October 2009

Converting Media Formats

There are so many media format in common use these days that it's difficult to keep up with them, not just with when and why to use each format, but also being able to read them or convert between them.

Lately I found the need to convert a couple of different file formats that Windows isn't natively strong with. If you've ever tried to track down a codec for a slightly different format, then you'll know how annoying and confusing it can be, especially when you want to export to another format.

There is one tool I have found to be very useful in this area, and it's a great piece of freeware. The name of the application is "SUPER © Simplified Universal Player Encoder & Renderer".


Here's a warning though - the website is not very aesthetic or user firendly, but it's worth the effort to get the free fully functioned application with codecs included. Just scroll to the bottom of the first two pages looking for the download link, and then the actual download link should be on the third page. If I post the download page link here it'll just redirect you to the first page anyway...

Just to prove that it's useful, here a vdeo I made with a an old .m4a file that I could finally convert to a more useful wav/mp3 and threw together twith some screen captures from Winamp's Milkdrop plugin. I wrote this track years ago (when I was in my "synth" phase), the original files are long gone...


Sunday, 4 October 2009

Installing Movable Type 4 on XAMPP

Yesterday, I finally got Movable Type 4 working on my development PC. I needed to install it for a project I am working on, and found it to be a lot more troublesome than expected. Movable Type is a weblog publishing system that was first released back in October 2001. It is written in Perl, and that's where the trouble started...

Downloading the latest version and setting up a virtual host for the test site was all as easy as I would usually expect. Then I pulled up the Quick Start Instructions to make sure I didn't make any assumptions. I carefully followed the process, making allowances for my install being on windows localhost, and met with failure after failure.

After much searching and reading, it became apparent that my old install of XAMPP required a Perl add-on patch. None of the download files I could find seemed to be the correct version, and since the current XAMPP installation package now includes Perl, I decided it was time to upgrade (see my previous post).

After the XAMPP upgrade, I started the Movable Type install again. More failures eventually pushed me to find a much more helpful installation guide from Brian Cantoni. Due to the multiple sites I have set up on my development PC, I used a different path in Step 3, and I chose to use SQLyog instead of phpMyAdmin for steps 4 - 6.

Step 7 is the crucial info missing from the Quick Start Instructions:
In the folder `c:\xampp\cgi-bin\mt4`, edit all the *.cgi files and change the first line to: `#!c:\xampp\perl\bin\perl.exe`

Unfortunately, Cantoni's guide doesn't mention how to handle the config file. Thankfully, you can find that information in Step 2 of this guide on etc. Another helpful hint in etc's guide is to use the MT system check script http://localhost/cgi-bin/mt/mt.cgi before trying to initialise your new install.

This is the point, I found that I still hadn't quite cracked it. I had some kind of Perl/mySQL install issue.
DBD::mysql
Your server does not have DBD::mysql installed, or DBD::mysql requires another module that is not installed. The DBD::mysql database driver is required to use MySQL Database. Please consult the installation instructions for help in installing DBD::mysql.

I resorted to installing ActiveState Perl to see how that compared. It wasn't the solution, but it did help me identify how to fix the DBD::mysql issue (I have subsequently uninstalled ActiveState). It seems that there was a dll file missing from C:\xampp\perl\site\lib\auto\DBD\mysql that XAMPP had already installed elsewhere on my machine. I copied the file C:\xampp\mysql\bin\libmysql.dll and pasted it into C:\xampp\perl\site\lib\auto\DBD\mysql and finally I had a working installation of Movable Type v4.31 on XAMPP v1.7.2.

Monday, 7 September 2009

How to use Playstation Controllers on PC

Last week I posted how useful I'd found the wired SingStar mic's USB adaptor to be outside of the SingStar game. Writing that post got me thinking about the old PS2* controllers and how useful these could be. Like many PS3 owners, I wasn't keen to shell out £35 on a second wireless controller and purchased a PS2/PS3 USB adaptor. This works pretty well on Little Big Planet or any other games not reliant on SIX-AXIS motion.

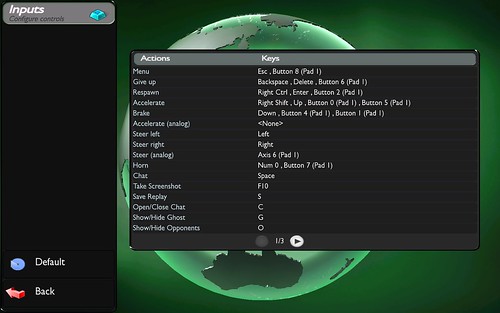
Because I had purchased this adaptor for the PS3, it had not occured to me before now to try plugging this USB adaptor into my PC. I tried this today and was pleased to see it automatically install as "HID-compliant game controller" on both XP and Vista. The next thing I did was fire up TrackMania Nations Forever on the hunch that it would be fun to play with a game controller. The controller was instantly recognised although all actions seemed to be assigned to the buttons on the left side of the controller. I prefer steering on the left and acceleration on the right, so I went into the Inputs configuration.

TMNF Inputs for game controller

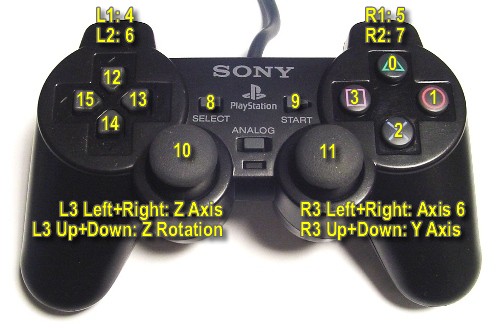
This is the point where things started to get a little confusing. I had no idea which button was Button 0 or 1 or 4, etc. So after a little but of experimentation I put together this handy reference image.
PS2 button numbers

I even tried this with an old PS1 controller and it also performed well (apart from the controller's buttons being a little sticky). The only difficulty I found (apart from mapping the buttons) was finding games that support game controller input, TrackMania is the only game I have installed that does. It is nice to play it with a controller though.

* Connecting a PS3 controller is a completely different process which is nicely addressed by davies lim and HowToGeek, although you map still find the the button map above to be useful.

Wednesday, 26 August 2009

mySQL row counter

Every now and then I come across a snippet of code which is incredibly useful at the time, but rarely used. The problem with these snippets is that I usually forget the particulars by the next time I need to use it.

Today I needed to use such a snippet and luckily for me, I knew exactly where I had last used it and was able to go straight to the source and grab it. This piece of SQL adds a row counter column to the result set. This is handy if you need to add a rank to records on a bulk insert, or create a new sequential key for on-the-fly table joins.

Here's a fairly simple example where the result set would return up to 50 rows:

SELECT (@rownum:=@rownum+1) rank, fieldname
FROM (SELECT @rownum:=0) ranks, tablename
WHERE something=TRUE ORDER BY fieldname ASC LIMIT 50


This concept can be taken one step further. In this example we update table_one's new_id field with table_two.id sequentially from the row with id value of 151.

UPDATE table_one INNER JOIN (Select @rownum:=@rownum+1 rank, id
FROM (SELECT @rownum:=150) ranks, table_two
WHERE something=TRUE) temp_table ON table_one.id = temp_table.rank
SET table_one.new_id = temp_table.id


Obviously this second example will only work where the id values are entirely sequential (no missing rows), but it worked well for the task I had to do and saved me from dumping the data into a temporary table just to be able to join for a one-to-one update.

I hope you'll find this as useful and interesting as I did :)

Friday, 22 May 2009

How To: Use a PS3 with LCD monitor

This topic is a little step away from my usual content but the question has come up a couple of times lately and I thought I'd post a "How To" guide.

Many owners are content with using their TV for PlayStation 3 games and Blu-ray DVD. Some will be taking advantage of recent advances in HDTV and using an HDMI cable, while others are stuck with standard TV via an RCA AV cable or SCART (in Europe).

If you own a recently manufactured LCD monitor, then it's possible that you could take advantage of the PS3's HD capabilities without having to shell out for a new HDTV. Many LCD models feature a DVI input (digital) as well as SVGA (analog).


Converting HDMI -> DVI
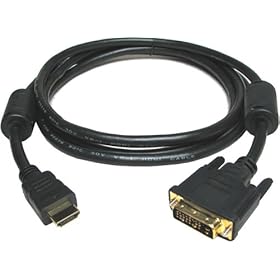
The PlayStation3 has two different audio/video outputs. The HDMI (High-Definition Multimedia Interface) port will transmit uncompressed digital data for video and audio. We can covert this to a monitor friendly format by using a HDMI->DVI cable. This cable drops the audio data but allows the digital video data to plug into a standard monitor DVI input. I'm using one of these cheap HDMI->DVI cables into a LG FLATRON W2042T and I'm more than happy with the result. The monitor also accepts SVGA which I use for my PC and switch between the two using the monitor's "Source" button.

What about audio?
The HDMI->DVI conversion drops the audio data - since most monitors don't support audio, especially not digital audio, you're probably going to need something else to produce the sound. The PlayStation 3 simultaneously produces output on both HDMI and AV channels, so we can use the AV audio feed. In my set up I am plugging the Red and White RCA leads into a Logitech X-230 Multimedia Speaker System via an adaptor that came with the speakers (2x RCA female to stereo 3.5mm female). This is probably the best sounding system in the lower price bracket and features a handy headphone jack on the front of one speaker.

What about Xbox 360?
As I understand it, this technique will not work with the the XBox 360 as it only transmits data on either HDMI OR standard AV. Apparently you can plug your Xbox 360 into SVGA using this Xbox 360 VGA Component Audio Cable. I've not seen the output quality, but from what I've read it's quite acceptable, although some users experience ghosting on text.